Manage Models
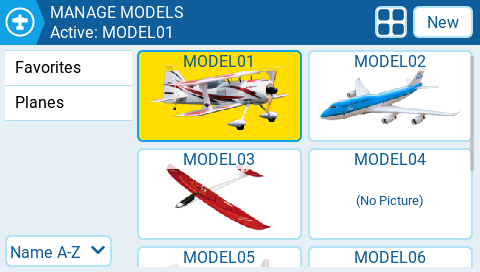
The Manage Models screen allows you to create new models, select which model is active, create and apply model labels, and create model templates.

Selecting & managing existing models
The active model's name will be highlighted (yellow in this case) and displayed on the screen's top bar. Double-tapping an active model will give you the following options:
Duplicate model - This option creates an exact duplicate of the model with the same name. Changes to the model name or other settings need to be made in the Model Settings tab.
Label Model - When this option is selected, all configured labels will be displayed and can be selected for this model. More Information about Model Labels is below.
Save as template - this option saves a copy of the model as a model template.
Changes to models saved as templates do not update the templates themselves.
Double-tapping on a non-active model (unhighlighted) will give you the following options:
Select model - this option selects this model as the active model.
Duplicate model - same as described above.
Delete model - this option moves the model to the deleted folder on the SD Card. Only models that are not active can be deleted.
Label model - same as described above.
Save as template - same as described above.
Creating a new model
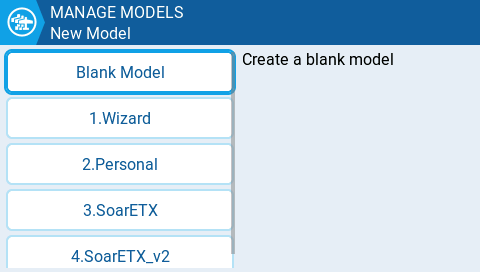
To create a new model, select the New Model button in the upper right corner. You will then be presented with the following options:

Blank Model - This will create a blank model with only the default options configured.
Wizard - This will launch the new model wizard and create the model as configured in the wizard.
Personal - This option will allow you to select one of your saved model templates and then create a copy of it as a new model.
SoarETX - This will display pre-configured model templates for radio-controlled model sailplanes.
SoarETX_v2 - This will display the more updated v2 of the pre-configured model templates for radio-controlled model sailplanes.
Model Labels
Model labels allow you to give each model one or more labels. You are then able to filter the models displayed in the Manage Models screen based on the labels that you select. This allows people with many configured models to find them easier. By default, the Favorites and Unlabeled labels are created automatically. All models are considered unlabeled until a label is applied to them.
Filtering models using labels
To filter the visible models based on their labels, select the filter or filters from the left column. It will automatically filter out the models that do not have those model labels. For more information on how the filters work or to configure advanced filtering options, see: Additional Radio settings
Assigning labels to models
To assign a label to a model, double-tap on the model or press [Enter] when the model is selected and then select Label Models. Once selected, all configured labels will be displayed and one or more labels can be selected for this model. Labels applied to the model will be designated with a check icon.
Creating new model labels
To create a new model label, select the New button on the bottom left of the screen. The Enter Label pop-up will appear and you can enter the desired label name. Select Save to save the new label.
Editing model labels
Long press [Enter] or long tap on desired label and you be shown a menu with the following options:
Rename Label - change the label's name
Delete Label - Deletes the label from the label list and from all models that have it assigned.
Move Up - positions the label higher on the list
Move Down - - positions the label lower on the list
Sorting models
The drop-down menu below the label list is for sorting the filtered models. Models can be sorted as described below:
Name A-Z
Name Z-A
Least Used
Most Used
Selecting the layout for the model list
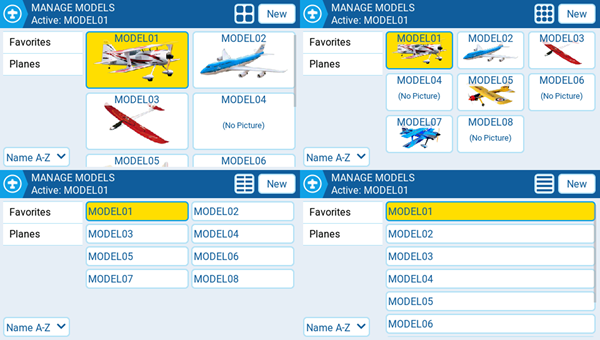
There are 4 layouts for the model list in the Manage Models page:

Large image (2x2) - Default layout
Small image (3x3)
Name only, 2 columns (2x6)
Name only, 1 column (1x6)
The layout can be changed by pressing the Layout button (next to the New button), which will cycle through the available layouts.
Last updated