Radio Settings

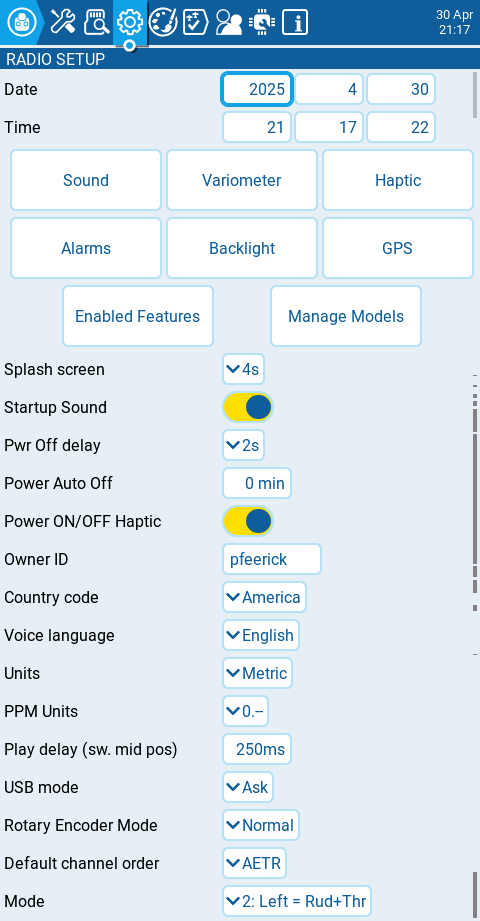
The Radio Setup screen is where you configure basic settings for your radio. It contains the following options:
Date - The current date. This date is used for the SD card log files.
Time - The current time. This time is used for the SD card log files.
Additional Settings Buttons - Additional configuration options for the named areas are available when selecting these buttons. More information about these configuration settings is on the next page - Additional Radio Settings
Splash Screen - Duration that the splash screen will be displayed.
Startup Sound - Toggles whether to enable/disable startup sound.
Pwr Off delay - The delay between when the power button is pushed and when the radio shuts off. The options are: 0s, 0.5s, 1s, 2s, 3s, 4s. It is recommended to set at least a 1s delay in order to prevent the radio from being shut off in the case of an accidental button press.
Power Auto Off - If enabled, the radio with automatically power off after the configured amount of inactivity, if there is no RF module with active telemetry, or an active trainer connection.
Power ON/OFF Haptic - When enabled, the radio with use the vibration motor to give a haptic pulse when powering the radio on (indicating when the power button can be released) and when the transmitter is powering off.
Owner ID - Custom registration ID used only for users with FrSky ISRM/ACCESS modules.
Country code - Used by some RF modules to ensure adherence to local regulatory RF requirements. Options are America, Japan, Europe.
Voice language - Language for the voice pack. This setting and the voice pack folder on the SD card must match for the sounds to be played.
Units - Units of measure. Options are metric or imperial.
PPM Units - Level of accuracy for PPM values are displyed. Options are 0.-, 0.0 or us (μs/microseconds).
Play delay (sw. mid pos) - The minimum time in milliseconds a switch must be in the middle position before a special function will get activated. This is used to prevent the middle position from being activated on a three-position switch when switching from low position to high position.
USB Mode - Sets the default action when a USB cable is plugged into the USB data port and the radio is powered on. Options are: Ask, Joystick, Storage, and Serial.
Hats Mode: how the hat switches will function (NV14, EL18 and PL18/PL18EV only).
Trims only: The Trim hat switches will be used to adjust the trim values only.
Keys only: The Trim hat switches will be used to navigate the menu options (as described below)
Switchable: Trim hat switch functionality can be changed between Trims and Keys on-the-fly.
Rotary Encoder Mode - Set to Normal by default. The Inverted option reverses the direction of the roller.
Default Channel Order - The default channel order for new models and the trainer screen. The letters stand for: A = Aileron (Roll), E = Elevator (Pitch), T = Throttle, R = Rudder (Yaw). Changing this setting does not affect existing models.
Mode - The stick mode that will be used for the transmitter. Defined by what actions the left stick takes. The options are:
1: Left = Rud+Ele
Rudder (Yaw)
Elevator (Pitch)
Aileron (Roll)
Throttle
2: Left = Rud+Thr
Rudder (Yaw)
Throttle
Aileron (Roll)
Elevator (Pitch)
3: Left = Ail+Ele
Aileron (Roll)
Elevator (Pitch)
Rudder (Yaw)
Throttle
4: Left = Ail+Thr
Aileron (Roll)
Throttle
Rudder (Yaw)
Elevator (Pitch)
Last updated