Radio Setup
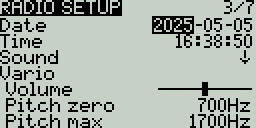
The Radio Setup screen is where you configure basic settings for your radio. It contains the following options:
Date - The current date. This date is used for the SD card log files.
Time - The current time. This time is used for the SD card log files.
Batt. range - Sets the maximum and minimum voltage for the battery meter. This should be set based on the type of battery you are using.
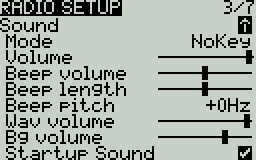
Sound
Mode - configures when to play sounds.
All - Beeps when the buttons are pressed and sounds are played when there are alerts or warnings.
No Key - No beeps when buttons are pressed or the scroll wheel is turned but does play sounds when there are alerts or warnings. Also plays sounds triggered by special functions.
Alarm - Only plays alarm or warning sounds. Also plays sounds triggered by special functions.
Quiet - No Beeps or sounds are played.
Volume - The master volume for the radio.
Beep Volume - Self-explanatory
Beep Length - Self-explanatory
Beep Pitch - Self-explanatory
Wav volume - The volume for alerts and warnings and sounds that are played with the Play track special function
Bg volume - The volume for background .wav files (music) that are played with the BGMusic special function
Startup sound - When enabled (default setting), plays the "Welcome to EdgeTX" sound on radio startup. The relevant file is located in /SOUNDS/??/SYSTEM/hello.wav (where `??` represents the two letter directory for your sound pack).

Vario (Variometer)
Volume - Volume for variometer beeps
Pitch zero - Low pitch frequency
Pitch max - High pitch frequency
Repeat Zero - The time before the tone repeats in milliseconds
Note: In order for the variometer to function, it must be turned on via the Vario special or global function. See Special Functions for more information on how to configure this.

Haptic
Mode - configures when the radio vibrates.
All - Vibrates when the buttons are pressed and when there are alerts or warnings.
No Key - No vibrations when buttons are the pressed or scroll wheel is turned but does vibrate when there are alerts or warnings.
Alarm - Only vibrates for alarms or warning sounds.
Quiet - No vibrations are made
Length - Duration of vibration.
Strength - Strength of vibration
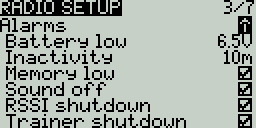
Alarms
Battery Low - Voltage to trigger low battery alarm.
Inactivity - Time to trigger inactivity warning.
Memory low - Enable/disable low memory warning.
Sound Off - An "alarms disabled" visual warning is displayed when the transmitter is turned on if the sound mode is set to quiet.
RSSI Shutdown - Checks if a receiver is still connected to the radio on attempted shutdown. Makes an audio and visual alert if one is detected.
Trainer Shutdown - Checks if there is a trainer signal still active on attempted shutdown. Makes an audio and visual alert if one is detected.
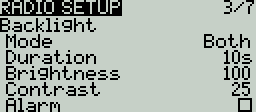
Backlight
Mode
Off – Always off.
Keys – Turns on when buttons are pressed.
Ctrl – Turns on when sticks, switches, and knobs are used.
Both – Turns on when buttons, sticks, switches, and knobs are used.
ON – Always on.
Duration - The length in seconds that the backlight is on. The minimum value is 5 seconds. The maximum value is 600 seconds.
Brightness - Adjusts the screen backlight brightness level.
Contrast - For LCD displays, adjusts the screen contrast setting. For OLED displays. adjusts the OLED brightness level.
Alarm - The backlight turns on when there are alarms or warnings.

Misc Settings
Splash Screen - Duration to display the splash screen. The options are --- (no splash screen), 2s, 3s, 4s, 6s, 8s, 10s, 15s
Power On delay - The delay between when the power button is pushed and when the radio turns on. The options are: 0s, 0.5s, 1s, 2s, 3s
Power Off delay - The delay between when the power button is pushed and when the radio shuts off. The options are: 0s, 0.5s, 1s, 2s, 3s, 4s. It is recommended to set at least a 1s delay in order to prevent the radio from being shut off in the case of an accidental button press.
Power Auto Off - If enabled (not enabled by default), if the handset is left inactive, with no trainer or telemetry link active, it will automatically turn off after the configured duration. You can select from 0 (disabled) up to 255 (minutes).
Power ON/OFF Haptic - If enabled (enabled by default), after the power on and power off delays have been served, there will be a haptic vibration to indicate the radio is powering on or off.
Owner ID (select transmitters) - Custom registration ID used only for users with ISRM internal RF modules, or on transmitters that support FrSky ACCESS external modules. If not configured manually, a random value will be used.

GPS
Time Zone - The time offset from UTC where the radio is being used. Can be configured in 15 minute increments.
Adjust RTC - Adjust the transmitter's real-time clock to match the time determined by the GPS.
GPS Coords - The GPS coordinate format that will be displayed.
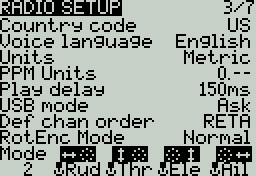
Misc Settings
Country code - Used by some RF modules to ensure adherence to local regulatory RF requirements. Options are America, Japan, Europe.
Voice language - Language for the voice pack. This setting and the voice pack folder on the SD card must match for the sounds to be played.
Units - Units of measure. Options are metric or imperial.
PPM Units - Level of accuracy for PPM values are displayed. Options are 0.- , 0.0 or us (microseconds).
Play delay (switch middle position) - The minimum time in milliseconds a switch must be in the middle position before a special function will get activated. This is used to prevent the middle position from being activated on a three-position switch when switching from low position to high position.

USB Mode - Sets the default action when a USB cable is plugged into the USB data port and the radio is powered on. Options are: Ask (ask on connect, the default), Joyst (Joystick) , SDCard (Storage), and Serial.
Def Chan Ord - The default channel order for new models and the trainer screen. The letters stand for: A = Aileron, E = Elevator, T = Throttle, R = Rudder. Changing this setting does not affect existing models. On Surface Radios, the letters stand for S=Steering, T=Throttle.
RotEnc Mode (Rotary Encoder Mode) (select radios)- Sets the direction of the rotary encode for the Roller. The options are:
Normal (default)
Inverted = Reverses the direction of the roller
V-I H-N = Vertical Inverted, Horizontal Normal
V-I H-A = Vertical Inverted, Horizontal Alternate (Inverted)
V-N E-I = Vertical Normal, Edit Inverted (inverted when editing text)
Mode - The stick mode that will be used for the transmitter. Defined by what actions the left stick takes. The options are:
1: Left = Rud+Ele
Rudder (Yaw)
Elevator (Pitch)
Aileron (Roll)
Throttle
2: Left = Rud+Thr
Rudder (Yaw)
Throttle
Aileron (Roll)
Elevator (Pitch)
3: Left = Ail+Ele
Aileron (Roll)
Elevator (Pitch)
Rudder (Yaw)
Throttle
4: Left = Ail+Thr
Aileron (Roll)
Throttle
Rudder (Yaw)
Elevator (Pitch)
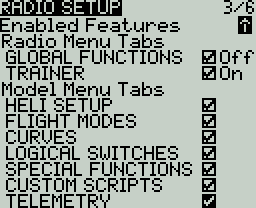
Enabled Features
The Enabled Features section of Radio Setup allows you to configure the Global settings for which tabs are visible in the Radio Setup and Model Settings area of EdgeTX. The configuration setting for the active model will show to the right of the checkbox. The model configuration will override the global configuration (which will be indicated by the "Off" and "On" shown next to any model level overrides).
Note: Turning off a tab only hides the tab and does not change the items already configured in that tab.
EXCEPTION: Turning off the Global / Special Functions tab will disable configured global / special functions for that model.
Pressing the [PAGE>] button will take you to the Global Functions screen.