EdgeTX User Manual
v2.11
v2.11
  • EdgeTX User Manual v2.11
  • Summary of changes since v2.10
  • Installing and Updating EdgeTX
    • Migrate from OpenTX to EdgeTX using EdgeTX Buddy
    • Migrate from OpenTX to EdgeTX using the Bootloader
    • Update from an earlier version of EdgeTX using EdgeTX Buddy
    • Update from an earlier version of EdgeTX using the Bootloader
    • Having trouble updating?
  • User Manual for Color Screen Radios
    • User Interface
      • Virtual Keyboards
      • Trim Navigation
    • Manage Models
    • Channel Monitor
    • Model Settings
      • Model Setup
        • Internal / External RF
        • Trainer
        • Timer 1/2/3
        • Pre-start Checks
        • Trims
        • Throttle
        • Enabled Features
        • USB Joystick
        • Customizable Switches
        • Other
      • Heli Setup
      • Flight Modes
      • Inputs, Mixes & Outputs
        • Inputs
        • Mixes
        • Outputs
      • Curves
      • Global Variables
      • Logical Switches
      • Special Functions
      • Custom Scripts
      • Telemetry
        • Sensor Configuration Options
        • Common Telemetry Sensors
    • Radio Settings
      • Tools
      • SD Card
      • Radio Setup
        • Additional Radio settings
      • Themes
      • Global Functions
      • Trainer
      • Hardware
      • Version
    • Screen Settings
      • Widgets
    • Reset Telemetry
    • Statistics
  • User Manual for Monochrome Screen Radios
    • User Inteface
    • Main View
      • Reset
      • Statistics
    • Model Settings
      • Setup
      • Heli Setup
      • Flight / Drive Modes
      • Inputs, Mixes & Outputs
        • Inputs
        • Mixes
        • Outputs
      • Curves
      • Logical Switches
      • Special Functions
      • Telemetry
        • Sensor Configuration
        • Common Telemetry Sensors
      • Display
    • Radio Settings
      • SD Card
      • Radio Setup
      • Global Functions
      • Trainer
      • Hardware
      • Version
  • Translated User Manuals
  • EdgeTX: How-To
    • Access DFU and Bootloader Mode
    • Contribute to the User Manual
    • Set-up wireless trainer with a Multi -protocol module
    • Use Bluetooth with EdgeTX
    • Configure Advanced Joystick with EdgeTX
    • Joystick Mapping Information for Game Developers
    • Disable Touchscreen
    • Use Trims to Adjust Global Variables
    • Configure a low battery alert
  • More
    • Additional Resources
    • Contributors
Powered by GitBook
On this page
  • Curves Configuration
  • Editing Curve Points
Export as PDF
  1. User Manual for Monochrome Screen Radios
  2. Model Settings

Curves

PreviousOutputsNextLogical Switches

Last updated 3 days ago

The Curves screen allows you to define custom curves to use in the Inputs, Mixes, or Output screens. The curves screen will show the configured custom curves, with a graphical representation of each curve.
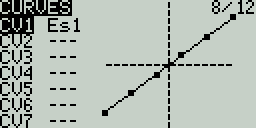
Selecting one of the curves or empty curve slots will open the configuration page for that curve.
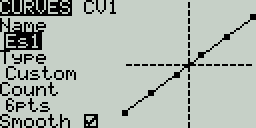
Curves Configuration

The curve configuration screen has the following configurable options:

  • Name - Name for the curve. Only 3 characters are possible.

  • Type - Type of curve: Options are Standard and Custom

    • Standard - Horizontal axis points are fixed values based on the number of points. Vertical axis points are adjustable.

    • Custom - Both horizontal and vertical axes are adjustable.

  • Count - number of points in the curve. Press the [Enter] button to modify the number of points. Long-pressing the [Enter] button will give the following additional options:

    • Preset - Allows you to set the curve to one of the preset slope values (-45 to 45 degrees in 15 degree increments). The curve will have 5 points, and smoothing is not enabled by default.

    • Mirror - Mirrors the selected curve.

    • Clear - Clears all curve values from the selected curve.

  • Smooth - When enabled, connects the points with curved lines instead of straight lines.

Editing Curve Points
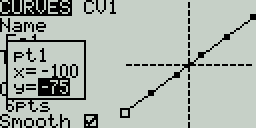
After the last configuration option (Smooth), you will automatically begin to scroll through the configured points on the curve. To change the values of the points, press the [Enter] button and then adjust the values as desired. For Standard curves, you will only be able to adjust the Y value. For Custom curves, you can adjust both the X and Y values.

Pressing the [PAGE>] button will take you to the Logical Switches screen.

Curves Screen
Curves Configuration Screen
Editing Curve Points pop-up