EdgeTX User Manual
v2.11
v2.11
  • EdgeTX User Manual v2.11
  • Summary of changes since v2.10
  • Installing and Updating EdgeTX
    • Migrate from OpenTX to EdgeTX using EdgeTX Buddy
    • Migrate from OpenTX to EdgeTX using the Bootloader
    • Update from an earlier version of EdgeTX using EdgeTX Buddy
    • Update from an earlier version of EdgeTX using the Bootloader
    • Having trouble updating?
  • User Manual for Color Screen Radios
    • User Interface
      • Virtual Keyboards
      • Trim Navigation
    • Manage Models
    • Channel Monitor
    • Model Settings
      • Model Setup
        • Internal / External RF
        • Trainer
        • Timer 1/2/3
        • Pre-start Checks
        • Trims
        • Throttle
        • Enabled Features
        • USB Joystick
        • Customizable Switches
        • Other
      • Heli Setup
      • Flight Modes
      • Inputs, Mixes & Outputs
        • Inputs
        • Mixes
        • Outputs
      • Curves
      • Global Variables
      • Logical Switches
      • Special Functions
      • Custom Scripts
      • Telemetry
        • Sensor Configuration Options
        • Common Telemetry Sensors
    • Radio Settings
      • Tools
      • SD Card
      • Radio Setup
        • Additional Radio settings
      • Themes
      • Global Functions
      • Trainer
      • Hardware
      • Version
    • Screen Settings
      • Widgets
    • Reset Telemetry
    • Statistics
  • User Manual for Monochrome Screen Radios
    • User Inteface
    • Main View
      • Reset
      • Statistics
    • Model Settings
      • Setup
      • Heli Setup
      • Flight / Drive Modes
      • Inputs, Mixes & Outputs
        • Inputs
        • Mixes
        • Outputs
      • Curves
      • Logical Switches
      • Special Functions
      • Telemetry
        • Sensor Configuration
        • Common Telemetry Sensors
      • Display
    • Radio Settings
      • SD Card
      • Radio Setup
      • Global Functions
      • Trainer
      • Hardware
      • Version
  • Translated User Manuals
  • EdgeTX: How-To
    • Access DFU and Bootloader Mode
    • Contribute to the User Manual
    • Set-up wireless trainer with a Multi -protocol module
    • Use Bluetooth with EdgeTX
    • Configure Advanced Joystick with EdgeTX
    • Joystick Mapping Information for Game Developers
    • Disable Touchscreen
    • Use Trims to Adjust Global Variables
    • Configure a low battery alert
  • More
    • Additional Resources
    • Contributors
Powered by GitBook
On this page
Export as PDF
  1. User Manual for Monochrome Screen Radios
  2. Model Settings

Display

PreviousCommon Telemetry SensorsNextRadio Settings

Last updated 4 days ago

The Display screen is where you configure the telemetry screens shown when pressing the [Tele] button from the main screen.

You can configure up to Four telemetry screens. You can choose one of the following display types for each screen:

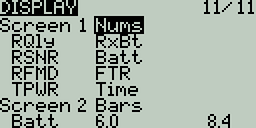
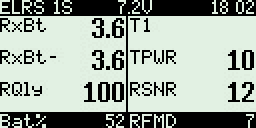
Nums (Numbers) - The numbers type displays the number value of the selected telemetry sensor or other configured object. The screen will be divided into two columns with four rows - each cell can display the data from a different sensor or object. On the display screen, the top bar will show the model name, radio battery voltage, and time in addition to the configured cells. If Timer1 is configured in the model, then it will replace the model name in the top bar.
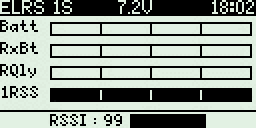
Bars - The Bars type displays a bar graph representing the value of the selected telemetry sensor or other configured object. The screen will be divided into four rows - each row can display the data from a different sensor or object. For each sensor, you must define the minimum and maximum values for the bars. On the display screen, the top bar will show the model name, radio battery voltage, and time in addition to the configured cells. If Timer1 is configured in the model, then it will replace the model name in the top bar. Additionally, a 5th bar will be shown at the bottom with the RSSI value.
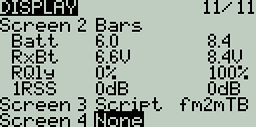
Script- The Script type executes the telemetry Lua script that is configured. The telemetry Lua script must be located in the SD card folder: SD Card->Scripts->Telemetry in order to be available to be configured.
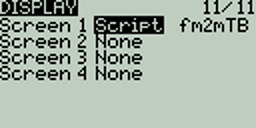
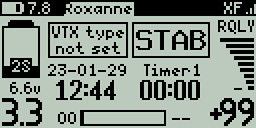
To configure the screens, scroll to the screen you want to configure and then press the [Enter] button. Then scroll to select the type of screen that you want to use and press the [Enter] button to select it. Depending on the selected screen type, you can then configure the telemetry objects for each cell by scrolling to the desired object and selecting it by pressing the [Enter] button. After all desired cells are configured, press the [Return] button to exit out of the configuration menu.

Additional Lua scripts for EdgeTX can be found here:

https://github.com/EdgeTX/lua-scripts
Display Numbers Configuration
Display Screen with Numbers
Display Bars Configuration
Display Screen with Bars
Display Script Configuration
Display Screen with fm2m Lua Script